Tuesday, 2 December 2014

Why Google Apps for Education is such a great platform for schools

I have recently blogged on a number of different aspects of Google Apps for Education (GAFE), from using Sites/Drive as a school intranet to Google classroom and Teacher Dashboard. However, as we are now heavily invested in Google as a platform, it is worth discussing some other developments that have been enabled by our use of GAFE.

Where we started

As we started using GAFE, it was clear that we had the opportunity to exploit the power of Google Apps scripts to create our own custom systems. We had already exploited the add-on scripts written by +Andrew Stillman for a number of systems, such as using a combination of #autoCrat and #formMule to create a learning observation system for teacher feedback and development. We also made use of the features of Google sheets (I'll go into some more great uses of Google sheets later) to do some post-processing on the data, so that we could analyse the results of the learning observations. 
1.1 Learning walk form - on submission uses autocrat to send a pdf version of the feedback.

Scripting

When I started at Nexus as an ICT integrator I started exploring the potential to use scripts to send Google form data into a calendar for a homework system, but found that I was startlingly incompetent and did not have the time. However, we really wanted to exploit the features of Google Apps scripts so we were fortunate enough to employ +Sam Scholefield to work with us to create some exciting new systems...

...Everything begins somewhere

Our initial problem was our homework system, which was effectively a Google spreadsheet embedded onto a Google site. A solution to a transparent system of homework setting that it was, it was rather clunky - staff submitted homework to a form, students then had to filter the resulting sheet by teacher / year group etc. to find homework.


1.2 Our old homework system - a form feeding into a google spreadsheet hosted on a site

Sam's first job was to make a better homework system, which, after a short time familiarising himself with Google apps script, he did. The new system pulled data from +Hapara's Teacher Dashboard (which is in turn taken from our MIS registeration system) so that we had all of our classes, staff and students. This then allowed staff to set homework using a to their classes using drop-downs, text entry fields and start / end date fields. The new system shows our students their "active" homework and also allows them to copy the tasks to their calendar for reminders. It is simplistic, intuitive and works well.
1.3 Our new homework system, combining data pulled from Teacher Dashboard with Google Apps script

Moving on

One of our next big goals as a school was to develop our own middle years program. Our Principal was keen to have a system that allowed us to define our own curriculum using a concept-based approach, which allowed us to map the curriculum by searching through a database of curriculum documents. Through a series of meetings, the content of the curriculum documents was established and trialled, and the next step was to create the system to host all of this. Sam spent a considerable amount of time creating the system. It is again based on GAFE scripts and works like this:

  1. Staff complete a custom Google apps script form for the 'Scope' of a unit of work. The scope contains learning goals, concepts, personal and transferable skills, success criteria etc.
  2. When complete, the form data is 'published'. This copies the data into a Google doc using a pre-set template.
  3. The completed documents are searchable using the custom search facility which allows searching by concepts, subject, title etc.


So, what next...

This post is really focussed on the power of GAFE as a school platform and what it can offer.  With a few tools utilised alongside it, such as Google classroom, you are approaching an excellent, free VLE. However, it is not perfect. You don't have a lot of the features of bought systems that have modules that can be added to allow homework submissions etc. However, with a few minor exceptions, many VLEs are expensive, clunky, outdated and horrifically designed. They are often mis-sold to schools/districts/governments who buy them without having a vision of technology but know they need something to move them on.

Anyway, stepping off my soap-box for a moment, the great thing about GAFE is that by using scripting (free ones, or paid) you can start to customise and build pretty much any kind of systems you want, all sitting on top of a core of a robust, collaborative cloud-based document storage system, which also happens to be free. 

The question is, how can schools gain access to a team of competent coders that also know the machinations of the average mind of a teacher or school administrator? 

In some private international schools, it might be possible to employ a coder (we did have one, but he has now left us...), either in the school or on a project-by-project basis, but this is potentially costly and fraught with issues (but maybe not compared to the cost of an expensive and inflexible corporate VLE). In public schools, the New visions cloud lab in the US is the start of this approach - a collaborative approach to solving the problem of getting customised systems written at a reasonable cost.

I feel that a shared approach like the New visions cloud lab is the best - a small team (maybe of one!) of developers that can be utilised when a school has a problem to solve, or to find ways to save time and teacher workload. However, how I might get together a group of Google-based, like-minded local and/or international schools that could utilise a group like this with Google scripting skills is the next challenge.


Thursday, 9 October 2014

Teacher Dashboard vs. Google Classroom

The approach

As usual, we try to look at new software / apps etc. in a very structured way. Dependent on what it may be (i.e. iPad App, whole school management tool), we will have a different approach. With classroom, we are looking at the tool from a whole school perspective, so we tend to go down the route of:


  • Tinkering for a few weeks by a select few - normally our ICT integration team
  • Introduced to a few volunteers for trial
  • Trial of a larger audience
This year is no different, but I thought now would be a good time to give a face-off of the two tools from a perspective of an actual user. We are only now at stage 2 of our trial. In terms of background, we are a Mac 1:1 school, use Google Apps extensively and have used Hapara's excellent Teacher Dashboard (TD) product for 18 months now. When Google Classroom was unveiled I saw it as a direct competitor to their product. My views have not changed after using the two.

Here is a brief lowdown on my feelings so far.

Teacher-student dialogue

Teacher Dashboard allows a teacher to view student work, give feedback on it using comments and navigate their Drive folders. Classroom allows the teacher to do the above, but also give marks and overall feedback outside of the document. Both tools allow teachers to 'send' documents to the students drive folders. Classroom also allows submission deadlines to be set and for students to submit documents rather than using their Drive folders. However, TD allows teachers to send different documents to different groups - your 'Beginning, developing, mastering' groups.

For me, Classroom just about wins here.

Whole school solution

Teacher dashboard is designed to engage with your student management system and allows classes to be uploaded from your MIS. This takes some tinkering*, unless you use systems that 'talk' to Teacher Dashboard. Classroom has none of this and requires teachers to do the set-up.

If you are looking for a solution that means every has no excuse not to use it, then TD is for you. However, it is very easy for teachers to set up classes in Classroom - make the class, send out a code!

Interface

Classroom is slick. Teacher Dashboard is, comparatively, not. I would have expected nothing less from Google.

Price

If this matters, Classroom is free.

Other stuff

From a teaching perspective, Classroom is idiot-proof. It makes the folders for students, sends work into their folders and removes the problematic issues of millions of shared documents and the associated emails. However, so does Teacher Dashboard. Some people argue that it removes the need to teach file management and makes students less capable. This is easily addressed by teaching these skills elsewhere.

What they both miss?

Teacher Dashboard does not really do this, and I don't think it is one of their aims, but both Classroom and TD could do with a mark book feature, where you can pull down, record, or access your grades. Management teams love this, and it is a useful feature to have. Classroom does allow grade recording and so I guess could easily add a Google sheets download/export to Drive grades feature, but I guess it is still in beta.

Overall

At this early stage, it is really hard to judge, but I guess the main differences in the products are very much down to personal choices and where your school currently sits. At the moment, it does not hurt us to run both, but at the end of the year I feel that we may have a tough decision to make, and this may depend very much on how Google develops classroom over the coming year.


Tuesday, 17 June 2014

Google sites - Perfecting permissions

In my last post, I went through the use of Google sites to make an intranet (or a simple site for your school, department or classroom). However, perhaps the real power in sites is the ability to set permissions for different users. For your Google domain, this allows you to make sites for staff and students and even have outside users accessing certain content or pages.

This post will hopefully help you to understand how permissions work in Google sites and the different complications that arise with sites shared with people both inside and outside of your domain.

There are two basic scenarios that I will use to outline how the permissions work. One, a site for users inside your domain and the second for external users.

Sharing and permissions inside your domain

These instructions relate to sharing with users inside your domain (e.g students and staff). If you want to make a site for the public / people outside your domain, the sharing works similarly, but you may want to skip this first section.

Default settings

By default (unless your domain administrator has changed this), your site will be Private. This means that no other domain (or external) users can access, view or edit your site. The first step is to change this setting by sharing the site with your users (either individuals or a group). You can then Enable page-level permissions.

What the different permissions mean:

By default, new pages inherit permissions by default. This means that any new page you make will automatically have all of the users that are added at site level. To add a new user, you have to add them at site level (the top level of the site - don't confuse this with the home page).

The dialog for setting custom permissions

To change these settings, you have to navigate to the page (in sharing and permissions view) you wish to change. Once there, you can change to custom permissions:

  1. Custom permissions: Add new users to this page.

    Basically, if you add a new user or group at site level, they will be able to access the page. This is useful when you may want to remove users  / groups later, but aren't so concerned about privacy (e.g. Year 7 students accessing an IB site)

    e.g. Year7_student is added at site level. All users in the group Year7_student will now have automatic access to the page on your site.

  2. Custom permissions: Do not add new users to this page.

    If you add a new user or group at site level, they will not automatically be added to the page. This is useful of you want to ensure that you have total control over which users / groups from your user pool are added (e.g. students accessing a staff site)

    e.g. Year7_student is added at site level. All users in the group Year7_student will have to be manually given permission to access this page.

Sharing and permissions outside your domain

In this scenario you may be making a site for external users to access (e.g. parents) who do not have accounts in your Google domain. The main difference here is that anyone outside of your domain (i.e. not in your Google Apps for Education domain) who does not have a Google apps account:

  • Cannot have view or edit access to the site (unless they create a Google account)
  • Cannot be invited as part of a user group (even if you make a contact list in gmail).

    For example, if you have a gmail contacts group with 10 mail addresses, of which 5 are not Google (e.g. hotmail, yahoo), they will not be added to the site as users.
Basically, if they don't have a Google account and aren't going to get one, forget about permissions other than Public on the web or Anyone with the link.

The solution

To get around this, there is only really one solution (besides getting your potential users to sign-up to a Google account!). 

At site level set the permissions to Anyone who has the link can view or Public on the web. Then, on each page you can change custom permissions and change this setting, if needed. This will only work if you have content that is suitable for sharing in this way (i.e. there is nothing on the page that you are concerned about sharing).


The dialog for changing visibility for a page when the site visibility is set to Anyone who has the link


To do this:

    • Turn on the Custom permissions on the page. This will allow you to change the basic sharing access from Anyone who has the link can view to Specific people.
    • You can still Add / remove users from your Google domain as normal (based on the settings described above) for either Add new users this page or Do not add new users to the page.


Last, but not least

Finally, there is one more important consideration for the content of your site that is on your pages. If you have embedded +Google Drive  or +YouTube content from your Google account, make sure that you check the sharing permissions on these documents. It's kind of embarrassing to spend all that time setting permissions on your pages, only to find the important document / video that you want your users to see isn't shared with them...

Monday, 16 June 2014

Creating a school intranet using Google sites and Drive

Since Google has been continually revising and improving its Sites and +Google Drive  products, at the start of this school year we decided to move to a combination of Google sites and Drive for our school intranet. Earlier this year, I wrote a small amount about our intranet, and thought I would expand this with a little more detail now it has been running all year.

The process was relatively simple, although time consuming, but thanks to the ability to set complex permissions and easily embed +Google Drive  folders into sites, we now have a fully featured intranet for Staff, students and parents.

Planning


The first step was deciding on the structure. To plan a project this large is important - we needed to ensure what content was going on the site and also the levels of access for different users. This would ensure that the structure would not need to be amended later and make the creation of the site run much more smoothly. As we were working on this as a team, we decided to map out the structure of the site using +Lucidchart, which allowed ICT staff to work collaboratively on the site structure quickly and efficiently.


The Site

Once the planning was complete, it was on to the creation stage. Whilst the basic templates on offer within Google sites are pretty good, we decided that a Nexus theme was more appropriate for ensuring that this gave the right message to staff, students and parents. I took a template from the online library and edited this theme for our school. Once this was done, it was relatively easy to create the pages that were to be accessed.


The next step was an important one to get right, and needs a lot of thought to ensure the right people can access the right resources (or not). Setting permissions in Google sites is straightforward once you know how it works, and this links to the correct set up and thorough planning of your Google intranet and your Google domain. Ensuring that you have separate groups for staff, students, parents and other stakeholders is essential. If this is not done, then you have the onerous task of adding new users individually to the site (the wrong way!), rather than quickly adding them to your Google domain groups (the right way!).

Moving on, page-level permissions were set for the different groups so that our staff would have a privately accessibly intranet, but that other users could also access information through the same address (by mapping the Google site to a domain address). The way Google sites works is that your users who do not have permissions for a page do not see it on their list of links (and therefore don't keep requesting access!)

Google Drive


I really like the ability to embed +Google Drive folders in sites - it's a powerful feature that makes using Google Sites / Drive for an intranet even more effective. On our staff site, we wanted the ability for all important shared documents (policies, procedures, planning documents etc.) to be easily accessibly both inside and outside of school and also control who can do what with these documents. To do this, I set permissions on the Drive folder so that (by default):
  1. Management (e.g. Head of School) have Can edit access
  2. Staff have Can view access
The Google Drive folder is currently owned by myself (more on document ownership later), but as management have Can edit access they can drop in any important document that staff may need to see. The power of Google Drive for this is obvious, but being able to track old versions, view online etc. is really great for school / staff administration. The other obvious advantage is the further ability to have custom permissions on a folder or folders. For example:

  1. A Staff folder (e.g. Policies) may be Can view for All_staff, but may contain an Can edit folder that is only editable by Head_of_dept (e.g. for departmental policies)
  2. A Staff folder (e.g. Planning) may be Can edit for All_staff, but may contain an Can view folder that is only editable by Management (e.g. an IB subject deadline schedule)

Document Ownership


An important consideration that is not necessarily linked to creating a school intranet, is ownership of documents. As our school moves forward and further embeds the use of Google Apps in our ecosystem, it is important to consider who owns the documents and how they can be migrated once staff leave. There are a few tutorials online about transferring ownership of files, but there are a few important things to consider:

  1. It might be worth having a +Google Drive account for all departments (e.g. Maths), that staff then transfer ownership of all their planning and policy documents with whenever they are created. This removes the need for sharing files at the end of the year (and any issues that arise if this is not done)
  2. Consider having a policy for when staff leave, covering:
    • What they must do when they leave
    • Who owns the files and what they can and cannot do with these files
    • A training session to help staff when they leave (and also smooth the handover to new staff)


Thursday, 20 March 2014

Google Apps for Education

My school has been using Google Apps for Education (Google Drive, Sites, Gmail etc.) since before I started here 18 months ago, so I felt it was a good time to reflect upon the challenges we have faced when using them. At Nexus, we use Google Apps as a kind of VLE - blending Sites to deliver lesson content and Drive for sharing work and for learners to upload work for teachers. We also felt that Google Apps offers a useful (but not proper) backup solution in our 1:1 school where we knew that the vast majority were not doing so.

From an IT educational perspective, I have background in using and working on a couple of 'VLEs' - Moodle and Sharepoint. Moodle was excellent although a little clunky to set up and I really liked the ability to set tasks, homework etc. and monitor through the system. Sharepoint, as a 'VLE', was horrendous.

First steps

The first decision that was made with Google Apps was that every learner should have a Google site for every subject. This meant that your average year 7 student would have up to 8 different sites. Within weeks we had a huge proliferation of sites. This was not necessarily a good idea, because:

  • Teachers needed to take hours to collect all of these sites together - Google Apps currently has no 'native' way of easily aggregating sites
  • The lack of training and direction in terms of why these should be used meant that most, if not all of the sites were not used.
  • Google sites are quite easy to use, but can take a long time to add content etc. and this can often get in the way of learning without a guided approach to their use.
  • Multi-page sites where evidence was getting buried and hard to find

Back to the drawing board - vision

First steps II

After these first steps we took a long look at what we wanted to achieve with Google apps. Our main reason for using Google apps was to try and improve student-teacher dialogue using electronic media, which the sites solution was not necessarily achieving. Our second reason was to facilitate access to students' digital work - the age old problem of the teacher working with students in the digital age but having issues accessing the work. Finally, we wanted to make better use of Google Apps for teacher and administrative communication.

Student work

Our first step was to install teacher dashboard (+Hapara Media).  This is a third party app that plugs into our Google domain and allows us to aggregate all of our classes so that teachers can see the work of only their assigned classes and students. This allows the teacher to look at work and give feedback easily (without the need for students to share work), send files to whole classes and easily distribute differentiated work. It can also work alongside excellent add-ons such as +Doctopus  and Goobric.

Teacher's classes are listed
All student work is easily located and accessible

With this in place, we also looked at the need for a site for reflective work. Rather than creating a site for each subject, we felt that it would be better to use one site for all subjects and try and limit this to a one page reflective blog for those subjects. This way, we felt that it be a more manageable experience for students and staff. This site is also accessible by teachers through teacher dashboard.  Many departments also decided to use Google sites for their departmental information sites or for their curriculum.

Administration

From a school perspective, Google Apps are a great tool for collaborative creation and storing of school policies that are accessible anywhere. Once we got a handle on the complexity of sharing and permissions and folders in Google Apps, we were finding a huge number of documents being shared which were very hard to locate. Human nature dictates that we store things in regular places so that they can be found easily, for example, placing car keys in a drawer near the door. Google Apps sharing tends to overwhelm people with endless shared documents with different names that need to be searched. This means that important documents can sometimes get lost, for example if the people we shared them with forget the name of them or if we haven't used sensible naming conventions. To address this, we used a combination of Google sites and drive, placing the important documents folders (from a feature introduced into Google sites late in 2012) on a site that staff could go to and easily find the documents they needed.

The power of Google Drive being that we could easily restrict permissions to certain documents (e.g. no access for students, view access for staff and edit access for management).

Intranet with embedded Drive folders

Other considerations

Finally, moving to a cloud based solution for staff and student work meant we needed a reliable back-up. It's very easy to assume that Google will recover all lost files (and some people use it as such). However, this does not cover situations where work is lost, either by intentional or accidental deletion. To cover this, we have moved to a cloud-based back-up solution (for Google Apps) in +Backupify. We have already (in the 12 months of using it) recovered more than 1 piece of essential student work that was otherwise lost. At the moment, I cannot see a time where we will move to an entirely cloud-based solution, but things can change very quickly.

Making it happen

To make sure all of this happens, we have tried to ensure that we have provided ample training for students and staff, so that they can see not only the benefits if using these tools, but also have the skills to use them. To ensure we are doing our best to support these parties, we have a structured training program in place and have also installed an excellent app called +Synergyse  so that staff or students can get interactive training when needed.

Next steps

As Google Apps become more embedded into our culture, it is important to ensure that we maintain training, especially for new staff. Additionally, we are finding increasing numbers of applications that 'plug' into Google so that we don't have issues of learners with multiple sign-ons and so that the files can be stored within Google Drive for ease of access. Some of the more used are apps are +Lucidchart and +GeoGebra. We are looking into a few others, such as +Tinkercad, +Quizlet  and a few others I haven't had the chance to try myself yet. 

Wednesday, 4 December 2013

Symmetry School: Learning Geometry

At my school, Nexus, we are currently investigating the improved use of apps/software in education, particularly ones which move our use of ICT forwards on the SAMR scale (more on SAMR in another post).

In my past experience, many of the 'educational' apps on both the Android and iOS stores have either been replication of tasks that could easily be done in class, often with engaging characters, animations and music, or replication of desktop apps such as Google Drive, Blogger etc. The first category of apps are, in my experience, often also very limited in terms of use for kids older than 3-4 years old. I might be wrong, but perhaps much of this is down to app/game designers being responsible for the content of these apps, rather than teachers.

So, at Nexus, we have spent the best part of a year now trying to find what we considered to be useful and valid apps to be used in the classroom, and I feel that there are some real gems starting to appear. The first one of these is Symmetry School: Learning Geometry by +SpraoiSchool.


The app


The app is very simple. Drag the coloured counters onto the grid to follow the line of symmetry. If a counter is in the wrong place it instantly resets itself. Each move that is taken adds one to the number of turns (enabling students to challenge themselves to improve). As the game gets harder, the counters change shape (common 2D shapes), the grid changes to have two lines of symmetry and the shapes on the grid have to be rotated to be perfectly symmetrical (the hard level introduces triangles, hexagons etc.)


Today, I trialled the use of this app with some year 2 students (7 year olds), who, by the end of primary school, should (these learning goals are taken from the IPC and UK national curriculum):


"Be able to identify the lines of symmetry of two-dimensional shapes"
"recognise reflective symmetry in familiar 2D shapes and patterns"
 "transform objects...visualise and predict the position of a shape following a rotation, reflection or translation"

The students were given an ipad each with the intention to solve the symmetry tasks generated by the app (with very little or no explanation of reflective symmetry). The only rules we gave them were:


  • Start on the easy level (the reflective symmetry part of the app has 3 levels)
  • Only move on when the teacher tells you OR if you complete the level with the correct number of moves

As with most ipad apps, the students were instantly engaged. However, my experience with many apps is that whilst they are engaged, they may not actually be engaged in any meaningful learning. Noticeably, they were also properly engaged on this app for a long period of time. The difference here was that:

  • They were progressing in their understanding of reflective symmetry - they very quickly understood how to reflect shapes/counters on one axis and move onto 2-dimensional reflections (and some even managed 2-dimensional reflections of multiple shapes and also rotation of those shapes)
  • They could make progress independently - many were at different stages based upon their current understanding
  • They all had 'success'. Each one of the students either moved up at least one level or consistently improved their understanding of reflection by completing a level or beating their personal best
This was a thoroughly enjoyable lesson to be involved in, and showed the power of technology in learning and how, if used properly, technology can make learning personalised, engaging, challenging and fun. 

The classroom teachers noted that this topic is often much harder to introduce in traditional ways and that often many students struggle to grasp an initial understanding. However, it is nothing if the learners don't make useful gains in knowledge, so the next step was to look at their understanding when challenged to recreate their experience on paper and in other tasks.

In practice

After the lesson with Symmetry school, the teachers of the class followed their normal routines of getting the students to draw shapes on a grid and reflect them, and other tasks such as cutting out reflected patterns and matching them. Anecdotally, they both commented that using the app was a better introduction and that the subsequent learning was much better in all learners. The time they had on this app ensured that they had an improved understanding of applying reflective symmetry in practice.

The next steps, to ensure this is utilised a little more effectively next year, would be to ensure that this app is more effectively worked into the scheme of work so it is part of a sequence of learning.

Tuesday, 26 November 2013

Creating a dynamic sign-up sheet using Google Forms and formRanger

Continuing on from my recent post about the Google Apps for Education Summit KL, I started work on a form for sign-ups for (possibly) Parent teacher conference (PTC). 

Using the excellent formRanger script by +Andrew Stillman , I was looking to create a form that dynamically changed the list based upon user selection - the idea being that once an item was chosen, it would be taken from the list.

The formRanger script allows a user to provide a list of options for a multiple choice question from a spreadsheet. The power of this is that it allows a multiple-choice option to be easily edited. The tutorial can be seen below and explains this a lot better than I can.


However, what it doesn't do automatically (unless I am wrong) is allow you to dynamically change that list (although my version is similar to a tutorial here). I wanted a form that can remove items that a user has chosen - in my example case, removing superheroes from a possible list of choices when someone has already selected it.

 I created 3 sheets on my 'superhero' spreadsheet:
  1. The responses (from the completed form)
  2. A chosen superhero page (to flag up if a superhero was chosen)
  3. A page to display the remaining courses available (looking at the ones not yet flagged)
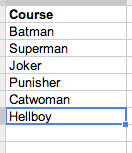
So, I first created my list for formRanger (some superheroes):


OK, so Joker isn't a superhero.


The next step was to work out how to get the spreadsheet to calculate if an option was chosen. My untidy 'hack' was to simply use a countif as a flag (perhaps a rather inefficient means, but it worked for me):

Formula checks if the sign-up list from the sheet FormResponses
has been completed using countif

Finally, I created a filter page to recreate the list based upon the flag (i.e. if the flag was 1, the superhero would not be taken across):


Batman is chosen by the user
countif flags the choice
The filter only moves the non-flagged items onto the new sheet

I then configured the formRanger script to run on submit, on change and every 5 minutes (to be on the safe side!) and set the assigned column to the amended list on the final sheet.


Once the script is run, after about 6 seconds (not sure if I can amend this time delay), the form is reloaded and Batman is no longer available to choose:


Finally, here's a quick video that hopefully explains it in a little more detail.